11 October 2019
Hi ExplorOz Reader,
We hope you'll enjoy this special edition newsletter just for owners of the ExplorOz Traveller app. Read on for some important news and a whole heap of useful FAQs.
VERSION 3.9.6 OUT NOW
New features recently added include: - option for up to 3 odometers added to map screen (adjust options in Settings)
- live ETA based on VTC (velocity to coordinate) formula shown in navigation status line
- addition of Replace option when using Place GoTo - cancels existing nav plan and replaces with the selected destination
- Update directions button renamed to "Re-Calculate" (visible at top of active nav plan)
You might have noticed that this is not the first update lately, infact we've made 12 app updates since our last newsletter in June. Because we update frequently, please set your device to Auto Update. And, because it's always better to let auto updates occur when the app is not
running we encourage you to close the app at night, or anytime it's not being
used.
Please read below for tips about closing/restarting the app
correctly.
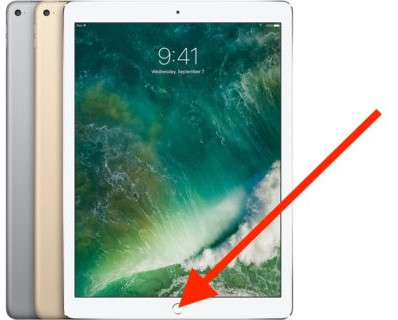
HOW TO CLOSE APPSAPPLE DEVICES - IPAD/IPHONEIf you have an iPhone or iPad, you have to double tap the Home button on the device, then swipe up on the app card for the app you want to close.
ANDROID DEVICES - PHONES/TABLETSIf you have an Android device, you have to press the soft-key button that brings up tiles for each app currently open (bottom left soft-key on Samsung), and then swipe left or right to close it. You will also see a CLOSE ALL APPS option which is very handy. We suggest you make it a habit of using this "close all apps" feature when you put your device on the charger. 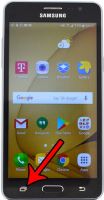
WINDOWS DEVICES - LAPTOPSOn Windows you use the TaskView button to view open apps and tap the X in the top right corner of the one you want to close.
 WHY A RESTART IS IMPORTANTThe next time your app is opened after a proper close (as explained above) it will get a flush out of any temporary cache, which ensures the device memory is not being over-consumed. When a device is low on memory (RAM) it can start to run poorly, such as slow to refresh map screen, or load selected content.
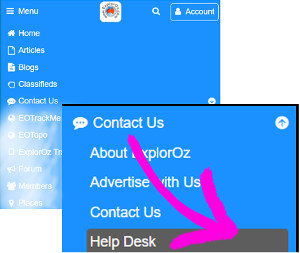
NEW HELP DESKThe ExplorOz business now has a centralised Help Desk system for dealing with all queries & correspondence instead of email. You'll find the Help Desk link located on the ExplorOz website in the main Contact Us section, as well as in the footer of the website. The LiveChat also forwards your message to the Help Desk if we aren't able to accept your incoming live chat. The Help Desk link is found in the site menu as shown below;
MY APP CONTROL PANELDid you know you can locate the "MY APP CONTROL PANEL" directly on the Home Page of the website (provided you are logged in to the website)? This makes getting to your Private Places, Private Treks, & Tracking super easy. Some features of the tracking management cannot be controlled in the app itself so take a look at this.
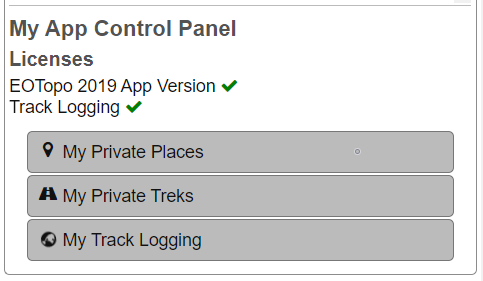
SHARE YOUR TRACKINGIf you have family/friends wanting to follow your trip whilst you are away, then you will need to have a Membership Subscription. Once you are a Member, simply go to the My App Control Panel, and click on the My Track Logging panel which will appear here. Then click Devices, then click on a Device and copy the DIRECT LINK. When your followers click the DIRECT LINK it will simply open the active tracking map for that device. (NOTE: if your device is not showing, you will need to enable tracking and move outside the Geofence, and ensure that the positions sync to the server).

Whilst you can have multiple devices tracked in your user account, our system detects each device separately so each device has it's own Name, Active Tracking Map, and Direct Link. NOTE: by default each
device is setup with Password Security so unless you de-select Security
your followers will also need to know your "Security Key". By default,
when your account is created this is the same as your login password.
Password and security key can be changed in your account section on the
website.
The Member Tracking service is all about sharing tracking data from
your device to a webpage for your followers to view your active
journey. The app itself is collecting and
storing tracking data every 50-200m but unless you use the switch on the
Home Screen (which is only accessible to Member) to ENABLE track logging
this data doesn't leave your device.
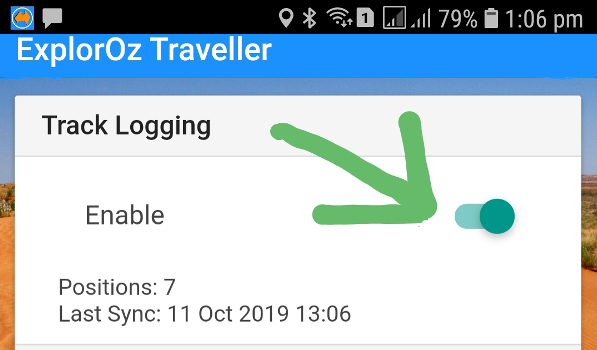
As you move, the app will record positions
(approx. 1 position every 50m). You will see the Position count
increase as the device collects and stores these. If the device is
connected to a Wifi or mobile data service, these positions will sync
automatically to our server (position count resets to zero) to update
your Active Tracking Map. When your followers open the Direct Link to
your tracking map they will see your current position up to the last
synched position that has been received - this will give a date and time
that the device was last seen. Your followers can zoom the map and
investigate the entire journey up to the current point.
MANAGE YOUR TRACKINGAlthough the sharing of your tracking happens automatically, you do need to Clear/Save your tracking when its not in use.
When you click SAVE, two things will happen. Firstly, ALL the positions that are plotted on the Active Tracking map will be extracted to create a TRACK LOG. The second thing is that the active tracking map will be cleared/reset.
WHAT ARE TRACK LOGS?
The TRACK LOG is a generic format for the management of route file data you've recorded with a GPS tracking device.
Here are 3 different ways you can record GPS tracking data and create your own Track Logs:-
- Use the SAVE option from your Active Tracking map to create a Track Log (Members only) - data can be recorded using the ExplorOz Traveller app, or the EOTrackMe app.
- Use the Positions Manager in the ExplorOz Traveller app to choose a Start Date and an End Date. The Track Log will be created using positions recorded whilst the app was running during those dates only.
- Use other GPS tracking software to create GPX, PLT or TCX files and upload to the Track Logs page on the ExplorOz website.
If you wish to open one of your Track Logs, you can change the default Title to something more meaningful (highly recommended). You can also write a Description. You can upload photos (use photos taken with your device camera and they will pin to the exact spot where they were taken). Use the Facebook, Twitter, or Email icons to Share your Track Log! Or, if you're a Member, Write a Blog on ExplorOz and embed your Track Logs.
SHOW ME A BLOG WITH A TRACK LOGHere are the Blogs we wrote about our July trip to Karijini - each contain a TRACK LOG with geo-referenced photos pinned to the map.
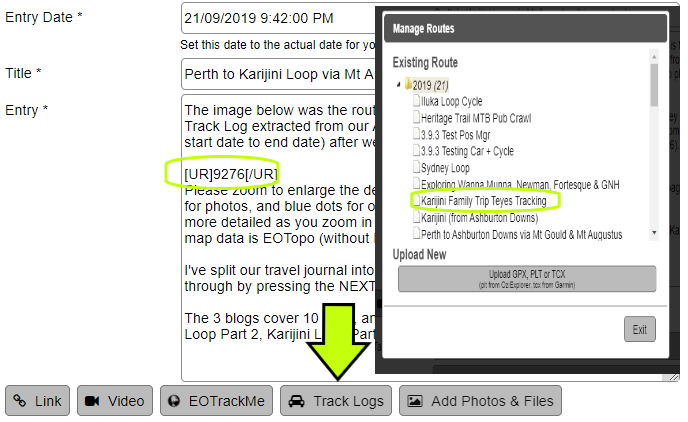
When you are creating a blog, starting writing your story, then press the TRACK LOGS button to bring up a list of all your saved Track Logs and select the one to insert. This will enter a code and a number. When you press the PREVIEW you will see the map as it will appear once you Submit the blog.
MORE HELPFUL TIPS
- If your device appears to be running slow on the map screen, this is likely the result of low CPU and we recommend de-selecting the TREKS from the map overlay. The Trek lines stay visible on the map but you won't be able to click on them.
- If you are in navigation mode (eg. following a Private Trek) and you go off course, the driving directions plan does not AUTO CALCULATE - however you can press the blue UPDATE DIRECTIONS button. To make this a little more obvious, we've just renamed this button RE-CALCULATE (v3.9.6). Just press this and the nav plan will recalculate distance and driving time to your next destination. This can be done as often as you like during travel.
- When you are doing your trip planning, try to avoid creating Private Treks that are TOO LARGE. Whilst it's nice to have an overall general plan of where you intend to travel to work out distances for multi-day trips, these can actually become quite cumbersome in reality to use and Murphy's Law predicts that things never go to plan. Go ahead and build your whole trip plan as a way to work out daily distances and general trip details but keep it only as a reference and DON'T ACTUALLY USE IT FOR GOTO. Instead, we recommend building daily Treks to navigate. You can also travel without having an active nav plan. See next point.
- The app is built with full offline navigation functionality so the app will track your moving position along the map when offline (using GPS lock). Because GPS uses satellite and not internet, you can retrieve position information about Places on the map when offline just by pressing any Place icon on the map. This will always give you the distance and bearing to the Place from your current position.
- For example, you see a camera icon appear on the map in the general vicinity that you are travelling. You can press the Place icon to investigate what's there and to see how far away it is (the GPS will calculate distance from your current position based on straight line). If you decide that sounds like a good place to go, you can press the GoTo button and the app will immediately load this Place into the navigator and if you press the green BEGIN NAVIGATION button it will provide direction & distance to get you there. Once you start moving, the app will also display ETA calculations, which will vary as you get closer or further away. ETA is a relatively new feature added in the last few months and is very handy. This method is very practical as it does something that Private Treks do not - it gives adjustments to your destination distance/travel time as you move towards it. Give it a try!
- If you choose to create a Public Place and later realise you have made a mistake, or if you find an error with an existing Public Place, please enter a Place Review advising the system administrator what to do. We read all incoming synced Reviews and look for this sort of information. We will action then remove your Review if necessary so please use this easy method to communicate with us. (Making a Review does not start a Forum Post).
- We encourage you to add photos to Places. Photos can be added to Places in the app even when offline. The app will store these and auto-upload when your device gets an internet connection. Please keep the system growing - your contributions matter!
WANT MORE TIPS?
Go to the ExplorOz
Traveller webpage - aside from video tutorials, we also document our most
common recent queries in the SUPPORT HELP section, which means we are
regularly updating this page to help you.
|